Disconnect or terminate an Airtel postpaid connection

I was using an Airtel 4G dongle and decided to disconnect. There was nothing wrong with the Airtel service, the reason to disconnect was very simple availability of cheaper wireless services from JIO.

Now I had already ported my primary mobile number to JIO, so it no longer necessary to have a separate 4G dongle connection for internet access. Around 2014, when I bought this Airtel 4G connection, there was no JIO hence Airtel 4G was the best option back then. Today with JIO around its a different story altogether.

So finally, I decided to terminate my Airtel 4G connection. However the hurdle that I faced was no straight forward information available online to process the termination request from home. And that is the reason I am writing this blog. May be someone may find this information useful.

So to process the disconnection request online and to avoid going to the Airtel Store, here is what you need do:

  1. Send a postpaid connection termination email request to Airtel at 121@in.airtel.com
  2. Call the Helpline number and file a request for termination. The helpline number is 1800-103-0405

Now technically any one of the above steps is enough but you just want to be doubly sure, hence log the request using both mechanisms.

On completing the above 2 steps, you will receive a call from the Airtel help desk, asking for a reason why you want to disconnect and they may propose you some alternate plan to keep you within the network. You have already done your home work and you have decided to terminate the services, so don’t fall for the trap and stick to your decision of terminating the services.

Here is a sample request letter for terminating the connection:

Sir/Ma’am,

I would request you to permanently disconnect/terminate and discontinue my existing AIRTEL 4G connection as I no longer require these services. This is for your kind information and necessary action.

My connections details are mentioned below:

Name:
Address:
Customer Relationship Number:
Mobile Number:

Request you to accept this request and acknowledge the same. I am also attaching a scanned letter request for your perusal.

Please terminate all 4G and mobile services from today!

Yours Sincerely,
<Your Name>

Important:

  1. Remember to initiate this termination (disconnection) request from the same email address on which you receive your online bill.
  2. When you initiate this request all postpaid services will stop from the next billing cycle.
  3. You may receive one last bill for final settlement. Pay this bill. It is your legal and financial responsibility to pay the final settlement bill. Not paying the final settlement bill will impact you CIBIL score.

Latest VMware tools package and version numbers

I was trying to figure out where can I find the latest VMware tools package and what build versions were released with what ESXi host build? And voila, all the information is already published by VMware.

The latest VMware tools package is always referenced at the following URL:

https://packages.vmware.com/tools/releases/latest/index.html

Where as if you need to know what VMware tools versions were released along with which ESXi host builds, then you can find that answer at the following URL:

https://packages.vmware.com/tools/versions

Windows 2003 VM Guest customization no longer supported

Today I deployed a Windows 2003 VM in a test infrastructure. I did not want to spend too much time installing and configuring the OS hence thought of using Windows 2003 instead of something like a Windows 10 or Windows 2016. ‘

Why  I still use and love to deploy Windows 2003 in my test environments? The reason is very simple:

  • Windows 2003 works very well in a nested environment
  • Windows 2003 virtual machine has a small  footprint does not require a lot of RAM nor does it require a lot of disk space.
  • Finally the important part; Windows 2003 was supported by VMware for guest customization under vCenter

Now here is twist in the story, I was trying the guest customization of Windows 2003 in vCenter 6.7 and guess what it failed. I did a bit of investigation why this was happening. I never expected VMware would stop supporting Windows 2003 guest customization under vCenter 6.7, but that’s exactly what the story is. VMware no longer supports Windows 2003 guest customization starting from vCenter 6.7

Here is the support document from VMware, that states Windows 2003 is no longer supported under vCenter 6.7:

Click to access guest-os-customization-matrix.pdf


Powercli oneliner for changing MTU to 9000

I wanted to set MTU on number of standard vSwitches across multiple ESXi hosts and Powercli made that job easier. Here’s a oneliner to get the job done across multiple vSwitches.

Get-VMHost My-ESXi-Host| Get-VirtualPortGroup "PG_SearchString*" | Get-VirtualSwitch | Set-VirtualSwitch -Mtu 9000 -Confirm:$false


Changing IP Address or hostname of the vCenter Server Appliance

A couple of days back during a discussion in a class, someone asked me if it is possible to change the IP Address of a vCenter Server appliance.

Short Answer:

Changing of IP Address is allowed. However changing of hostname (FQDN), also referred to as Primary Network Identifier (PNID) is not allowed.

Long Answer:

So the long answer, yes it is possible to change the IP Address of a vCenter server appliance after the deployment. (It is also possible to change the IP Address after a vCenter migration from a Windows instance to an server appliance.) One can change the IP Address by connecting to the Virtual Appliance Management Interface (VAMI) located at https://vcenter_server:5480.

Remember after changing the IP Address don’t forgot to update the forward and reverse DNS records.

There one corner condition when changing IP Address is does not work, this is specifically when one has configured a vCenter server appliance with an IP Address (without DNS records). In such cases it is not possible to change the vCenter server appliance IP Address.

However I don’t recommend changing IP Address of a vCenter instance after it has been deployed. Very simply there are many dependencies to take care of which can potentially break things in your environment. Hence always spend some time before deploying a vCenter instance and come up with a long term design strategy of  correct Hostname & IP IP Addressing policy.

Creating a PDF from a list of JPG image files

Here is a Perl script that creates a PDF from list of JPG images. This script uses the PDF::FromImage CPAN module.

#!/usr/bin/env perl
# Perl Script to create a PDF file from a sorted list of JPG images
# This script uses the PDF::FromImage module.
#
# To install PDF::FromImage module on Windows with Strawberry Perl
# execute the following commands in a Command Shell
# The following command assumes Strawberry Perl in PATH
# c:\&amp;gt; perl -MCPAN -e shell
# c:\&amp;gt; install PDF::FromImage;
#
# This script assumes there is a list of 300 JPG images with names 
# in the CURRENT_DIRECTORY in acsending order.
# E.g. fileprefix_1.jpg, fileprefix_2.jpg, fileprefix_3.jpg ...
#
#
# Steps to use the script:
# 1. Save this script as make_pdf.pl in the directory where you have
# the JPG images
# 2. Install the Perl Module
# 3. Edit the script modify as per requirement
# 4. run the script from commandline.
#
use strict;
use PDF::FromImage;
my ($prefix, $pdfname, @files)
# Enter a prefix for your image files
$prefix = 'file_prefix';

# Enter the PDF name without the ".pdf" extension
$pdfname = 'my_pdf_name';

for (my $i=1; $i load_images(@files);
$p->write_file($pdfname . '.pdf');

Perl Script to create a PDF file from a sorted list of JPG images. This script uses the PDF::FromImage module.

To install PDF::FromImage module on Windows with Strawberry Perl
execute the following commands in a Command Shell. The following command assumes Strawberry Perl in PATH

c:\> perl -MCPAN -e shell
c:\> install PDF::FromImage;

This script assumes there is a list of 300 JPG images with names in the CURRENT_DIRECTORY in ascending order.

E.g. fileprefix_1.jpg, fileprefix_2.jpg, fileprefix_3.jpg …

Steps to use the script:

  1. Save this script as make_pdf.pl in the directory where you have
    the JPG images.
  2. Install the Perl Module.
  3. Edit the script modify as per requirement.
  4. Run the script from the command line.

Configure network interface using nmtui

In my previous post, I wrote about how the network interface within a CentOS 7 environment can be configured to automatically get activated at boot up. In that post we discussed the command line tool

 ifup ens160 

and later edited the file

 /etc/sysconfig/network-scripts/ifcfg-ens160 

We can also achieve the same behaviour using the network manager text user interface also called as the nmtui.

  1. Start the nmtui wizard
     nmtui 
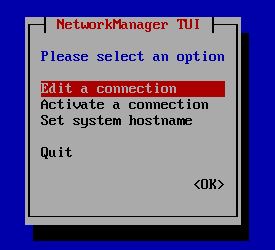
  2. select the Edit a Connection Option
    img1
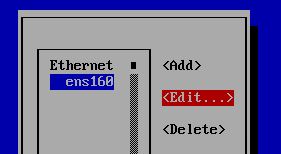
  3.  Select the appropriate connection (network adapter) and then select edit
    img2
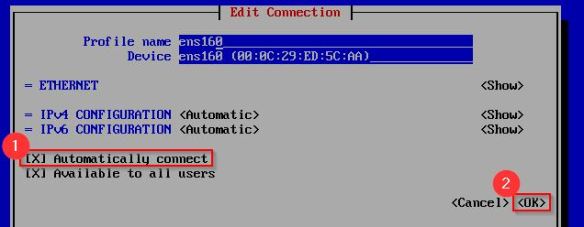
  4. On the edit screen use the select the Automatically connect checkbox and then select OK
    img3
  5. In case you want to temporarily deactivate (bring down) the network adapter (connection) use the Activate a connection option from the main screen.

The network manager TUI is an user interactive tool whereas there is also a non-interactive tool to achieve the same. The tool is called as:

 nmcli